Haunted Castle in the Forest Shadow Box: A Refined Approach to Spooky Decor
You must have creepy things on Halloween; that is the whole point of the celebration. However, not everyone wants their front porch to look like a crime scene or their living room to resemble a slaughterhouse. There is a growing audience of creators and homeowners who prefer a more refined Halloween aesthetic—one that relies on atmosphere rather than shock value. This is where the Haunted Castle in the Forest Shadow Box shines. It offers a touch of mystery without relying on overly gory or shocking elements, making it perfect for those who appreciate the artistry of the season just as much as the scare.
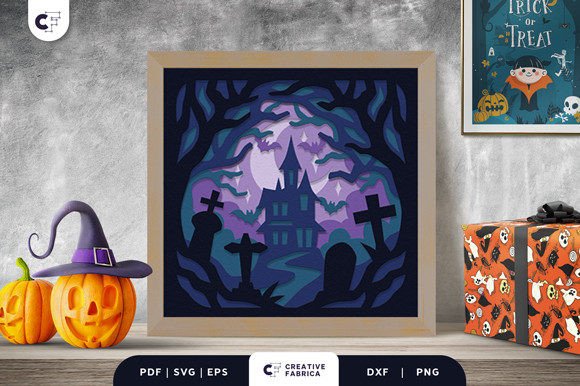
This type of decor appeals to a specific sensibility. The Haunted Graveyard Shadow Box displays a spooky night in a haunted castle with an eerie ambiance, utilizing depth and silhouette to tell a story. When you look at the design, you see many dark silhouettes that you can't immediately distinguish. Is that a zombie hand reaching out from the grave, or is it simply a gnarled tree twig? That ambiguity is what makes it so effective. It engages the viewer's imagination, forcing them to lean in and look closer, which is often far creepier than a plastic skeleton jumping out at them.
Why Choose a Digital Shadow Box Design?
In the past, creating layered paper art required advanced drafting skills and hours of manual cutting. Today, digital designs have democratized this craft. This specific digital design can be transformed into various artwork, including a traditional shadow box and a modern lightbox. The versatility is key for different users. A hobbyist might want the classic look of a framed piece hanging on a wall, while a small business owner running a seasonal pop-up shop might prefer the glowing effect of a backlit version to draw attention in a dimly lit corner.
The file formats provided—SVG, PDF, EPS, PNG, and DXF—ensure compatibility with almost any workflow. If you are a freelancer using a Cricut for client gifts, the SVG file allows for precise cutting of intricate details. If you are an educator teaching a class on perspective and layering, the PDF might be easier to print and trace for students without access to expensive machinery. Even those with industrial tools like a CNC router machine can utilize the DXF files to cut thicker materials like wood or acrylic, turning a paper craft concept into a durable architectural element.
Real-World Applications Beyond the Front Door
While the most obvious use case is home decoration, the applications for the Haunted Castle in the Forest Shadow Box extend much further when you consider the needs of different creators and professionals.
- Small Business Owners and Retailers: Imagine a boutique coffee shop or a bookstore looking to update their window display for October. Instead of buying cheap, mass-produced plastic decorations that look tacky under fluorescent lights, they can create a custom, high-end display using this design. By layering cardstock in varying shades of black and charcoal, they create a sophisticated vignette that aligns with their brand identity while still celebrating the holiday.
- Educators and Workshop Leaders: Art teachers and community center coordinators can use this project to teach spatial reasoning. The design consists of six distinct layers. Explaining how each layer contributes to the final illusion of depth provides a practical lesson in physics and art history. Students learn that shadows aren't just absences of light but tools for shaping perception.
- Content Creators and Bloggers: For lifestyle bloggers or YouTubers focusing on DIY and home decor, this project offers excellent visual content. The process of assembling the layers, choosing the right paper texture, and lighting the final piece makes for compelling "behind-the-scenes" footage. It demonstrates expertise and taste, helping creators build authority in the niche of elevated seasonal decorating.
- Event Planners: Wedding planners who specialize in gothic or alternative themes can adapt this design for reception table centerpieces. By scaling the design down or using translucent vellum for certain layers, it becomes a romantic yet spooky accent for an October wedding, proving that Halloween decor doesn't have to be juvenile.
What You Need to Bring This Design to Life
Executing this project successfully requires more than just downloading the file; it requires an understanding of materials and assembly. To make this lovely shadow box a part of your Halloween festivities, you need to gather the right supplies. The subtle approach of this design means that material quality matters immensely. If you use flimsy printer paper, the layers will warp, and the crisp silhouettes will lose their definition.
Here is a practical checklist for getting started:
- Paper Files Design: Ensure you have downloaded all the necessary layers from the package. Double-check that your software reads the SVG or DXF correctly before sending it to your machine.
- Cutting Equipment: Use a cutting machine such as a Cricut, Scan n Cut, or even a CNC router machine depending on your desired material thickness. Precision is vital here; jagged edges ruin the illusion of distance.
- A Frame with Suitable Size: The design is optimized for a size of 20.32×20.32 cm (approximately 8x8 inches). You need a frame deep enough to accommodate six layers of cardstock plus spacing. Standard photo frames often won't work; look for "shadow box" frames specifically designed for 3D depth.
- Adhesives: Glue or double-side tape is essential. Foam adhesive squares are highly recommended because they provide consistent spacing between layers, which is crucial for creating those deep, mysterious shadows.
- Lighting Considerations: While not a physical tool you buy with the frame, planning your light source is part of the build. Will this sit near a window to catch natural moonlight, or will you install an LED strip inside the frame? The latter turns the piece into a lightbox, highlighting the textures of the cardstock.
Considerations Before You Start Cutting
Before you commit to this project, there are a few realistic observations to keep in mind. First, consider the color palette. The note provided with the design mentions that the final product color may vary slightly due to lighting sources and the paper color. This is not a disclaimer to ignore, but a design feature to leverage. All cardstock featured in the preview might look uniform, but in reality, mixing matte black with glossy black or charcoal grey can add significant dimension. Don't be afraid to experiment with paper weights; heavier cardstock stands up better over time and casts sharper shadows.
Secondly, think about the longevity of your creation. The prompt notes that the subtle approach makes the design suit various scary events besides Halloween. If you choose neutral tones and high-quality materials, this piece can transition from a Halloween decoration to a year-round gothic art piece. This is particularly valuable for renters or those with limited storage space who cannot justify buying decor that sits in a box for eleven months of the year.
Finally, remember that the number of layers—six in this case—dictates the complexity of the assembly. It is not a five-minute craft. It requires patience. You need to ensure each layer is perfectly aligned. If layer three is skewed, the silhouette of the castle tower might not line up with the forest background, breaking the immersion. Take your time during the dry-fit stage before applying any glue.
The Value of Atmosphere Over Gore
In a market saturated with animatronic witches and buckets of fake blood, the Haunted Castle in the Forest Shadow Box offers a refreshing alternative. It respects the intelligence of the viewer. It understands that the most potent fear comes from the unknown—the shape in the corner of your eye that you can't quite identify. By using this design, you are participating in a tradition of storytelling through visual arts.
Whether you are a marketer looking to create a unique brand activation, a parent wanting a safe but spooky activity for older children, or an artist exploring the interplay of light and dark, this resource provides a solid foundation. It bridges the gap between digital convenience and tactile satisfaction. You get the precision of a computer-cut design with the warmth and texture of hand-assembled paper art.
Ultimately, the goal of Halloween decor should be to evoke a feeling. Whether that feeling is a jump-scare thrill or a lingering sense of ancient mystery depends on your style. For those who lean toward the latter, transforming this digital file into a physical object allows you to curate an environment that is hauntingly beautiful. It proves that you don't need guts and gore to make a space feel truly alive with the spirit of the season. Sometimes, all you need is a castle, a forest, and the right amount of shadow.